http://www.photohobby.net/learning/filter.html
แต่ขอโทษ ได้ใจไปเต็มๆครับ โดนจริงๆ ขอแปะลิ้งค์ไว้หน่อยเหอะ
แสดงบทความที่มีป้ายกำกับ diy แสดงบทความทั้งหมด
แสดงบทความที่มีป้ายกำกับ diy แสดงบทความทั้งหมด
วันพุธ, ธันวาคม 31, 2551

วันอังคาร, ธันวาคม 23, 2551
… homemade USB camera shutter release …
http://www.cibomahto.com/2008/02/thing-a-day-day-27-remote-trigger-for-powershot-s3/
อันนี้ด้วย http://armanbohn.com/blog/2008/05/22/homemade-usb-camera-shutter-release/
Canon did not include a remote trigger option in this camera, however there are many times when I have wanted one. Recently, though, the CHDK people figured out that you can use the USB port on the camera as a trigger. It’s a great hack- the camera already has hardware to detect when the camera connects to your PC, so they captured that event and made it scriptable. This works well for what I wanted to do, which is to take long exposure shots without disturbing the camera. A potential drawback to this method, however, is that the camera can take up to a second to respond to the trigger. This means it will not be useful for syncing captures to a fast event. There are two parts to this project, building the hardware and getting the CHDK program running on your camera. Some quick instructions are after the break.
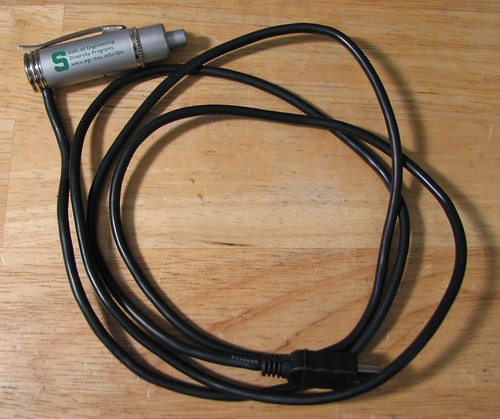
First, the hardware:
อันนี้ด้วย http://armanbohn.com/blog/2008/05/22/homemade-usb-camera-shutter-release/
Canon did not include a remote trigger option in this camera, however there are many times when I have wanted one. Recently, though, the CHDK people figured out that you can use the USB port on the camera as a trigger. It’s a great hack- the camera already has hardware to detect when the camera connects to your PC, so they captured that event and made it scriptable. This works well for what I wanted to do, which is to take long exposure shots without disturbing the camera. A potential drawback to this method, however, is that the camera can take up to a second to respond to the trigger. This means it will not be useful for syncing captures to a fast event. There are two parts to this project, building the hardware and getting the CHDK program running on your camera. Some quick instructions are after the break.
First, the hardware:
This is the schematic we want to achieve: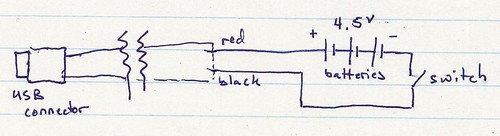
You could build a box and put the components in it, however I found a light-up pen that has all the parts in it. It also occurs to me that something like a mintyboost would also work, if it has a switch to turn the power on and off. Here are the parts before disassembly: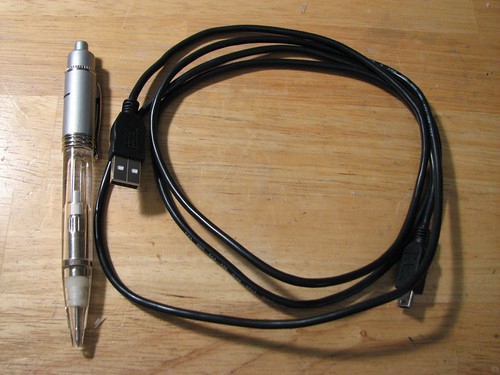
Once the hardware is done, the second part is to get the software set up. I first downloaded the ‘allbest’ build of CHDK from here. The files DISKBOOT.BIN and PS.FIR should be extracted and placed in the root directory of the camera’s SD card (you need a card reader for this). Next, put the card in the camera, and turn it on in play mode (it is important not to go into record mode first). There should be a menu option called ‘update firmware’, select that and agree to everything. This should cause CHDK to load and set up a directory structure on the card. Turn the camera off again, take the card out and put it back in the computer. There should be a CHDK directory on the card now. Copy the following uBasic script to a text file called remote.bas, and save it in the CHDK/scripts/ folder (which should have been created automatically):
The script came from here:
@title Remote button
:loop
wait_click 1
is_key k "remote"
if k=1 then shoot
goto "loop"
end
Now, put the card back in the camera again, and do the firmware load deal again to get the CHDK software running again. CHDK never installs itself on the camera, however there is a way to make it load automatically if you are interested. Get into ALT mode (which assigns different commands to the buttons) by pressing the ‘print’ button on the camera. Once in ALT mode (it should say 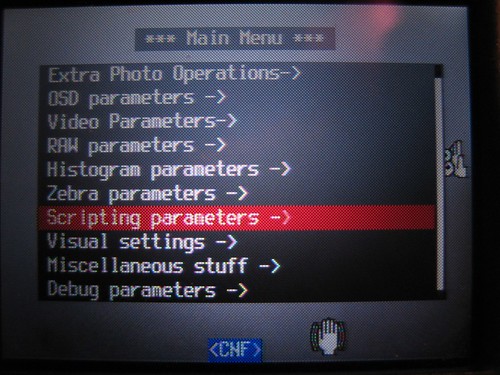
Then select ‘load script from file’, choose the remote.bas script created earlier, and make sure ‘enable remote’ is selected in the scripting menu.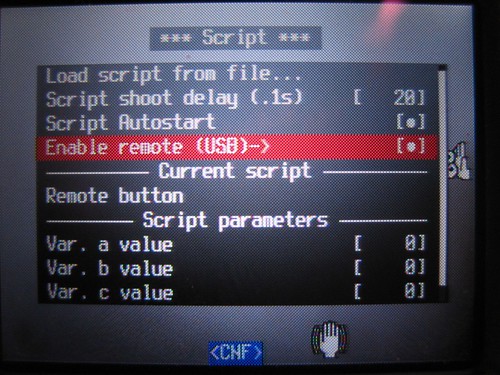
Close the menu and press the shutter button to start the script. If all went well, the screen should look something like mine below. Plug in the remote and press the button to take a picture!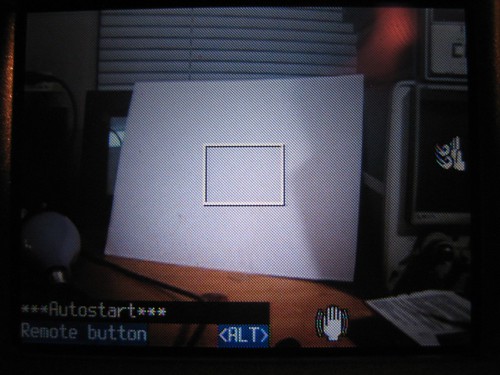
--------------------------------------------------------------------------------
Thanks to someone over on this website, I was able to convert a clicky pen into USB shutter release. It is designed for and works great with my CHDK modified A640.
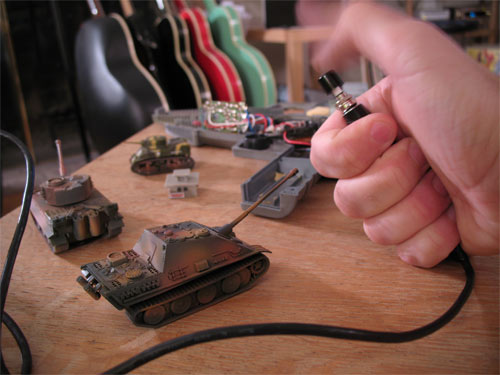
With some electrical tape, my soldering iron, some tin foil, a few batteries and a push button switch, I was able to get this thing working in about an hour.
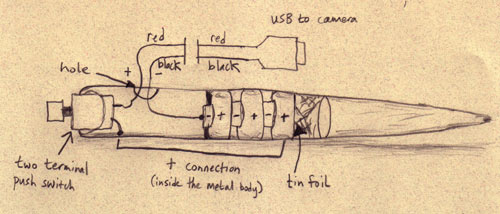
[Note - you have to use a metal pen that conducts on the inside]
I cut the “computer” end off of the USB cable and soldered the black wire to the negative lead of the battery. I smashed some tin foil down in the end of the pen so that the positive side would make contact with the inside of the metal body. This was conected to one side of the push button switch. The other side was connected to the red lead of the cut USB cable.
Now I can shoot controled single frame animation with my 10 mega pixel camera!
I also got my little bunkers and tanks for the “Combat” shoot which is coming up soon!
วันศุกร์, พฤษภาคม 23, 2551
Soft Flash Popup เวอร์ชั่นสิงห์อมควัน
http://www.instructables.com/id/Cigarette-Packet-Flash-Diffuser/
ไอเดียดี ทำง่ายสุด thank crimsonbelt again
และยังมีไอเดียข้างเคียงอีกหลายหลาก
แต่ เอ่อ... วัสดุที่ทำนี่ สสส. คงไม่แฮปปี้เท่าไรนัก
ไอเดียดี ทำง่ายสุด thank crimsonbelt again
และยังมีไอเดียข้างเคียงอีกหลายหลาก
แต่ เอ่อ... วัสดุที่ทำนี่ สสส. คงไม่แฮปปี้เท่าไรนัก
วันพุธ, พฤษภาคม 21, 2551
วันศุกร์, กุมภาพันธ์ 22, 2551


วันศุกร์, กุมภาพันธ์ 08, 2551
Change TV Channels Without A Remote!

This hack shows you how to change TV channels without a remote control, and annoy your family!
Take Infrared Pictures With Your Digital Camera

These are also known as "x-ray pictures". Please do not use for non-intended purposes...
ของเล่นง่ายๆ น่าสนใจ Simplest Electric Motor

Build your own ultra-simple electric motor with only a battery, magnet, and a bit of wire. Takes only a minute to build, but will keep you mesmerized for hours. Makes a hypnotizing spiral screw movement. What makes this work? Leave a comment with your theories. Featured in Make volume 1. Cool science project. Impress your friends.
นี่ก้อด้วย
Homopolor Motor - Funny blooper videos are here
$1 Image Stabilizer For Any Camera - Lose The Tripod

Don't be a slave to your tripod. Build this stabilizer and see how much better you photos and video can be. Get professional results. This instructional video shows you how to build your own stabilizer in 5 minutes for less than $1. It is super light weight and folds up small enough to fit in your pocket. With this stabilizer, you can hand-hold your camera with shutter speeds at least 3 stops slower than without. It works just as well with video cameras.
วันจันทร์, ตุลาคม 29, 2550
ติดแผ่นกันลื่นให้กับกล้อง

| Rating: | ★★★★★ |
| Category: | Computers & Electronics |
| Product Type: | Digital Cameras |
| Manufacturer: | เพื่อนก้อง |
เงาแว้บเรียบบางมน
ผลปรากฏว่าจับได้ไม่ถนัด ถ่ายไป300กว่ารูปเมื่อยมือเลย ตะคริวจะกิน
ผมเลยนึกขึ้นมาได้ว่าเพื่อนผมอีกคน เคยทำแผ่นกันลื่นให้ palm zire 71
เลยกลับไปค้นดู แล้วคิดว่าจะมีประโยชน์กับชาวใช้กล้องครับ เผื่อใครจะสนใจ
รายละเอียดตามไปอ่านได้ที่นี่ครับ http://www.mrpalm.com/getcontent.php3?tid=198
วันพฤหัสบดี, สิงหาคม 16, 2550
ขาตั้งหนวดปลาหมึก
เขาเรียก gorillapod
ของเมืองไทย นี่เลยครับ คุณธนา ลองDIY มา ง่ายๆ ไม่แพง และน่าจะดีไม่แพ้กันครับ
http://www.pantown.com/board.php?id=5050&area=4&name=board11&topic=152&action=view
ขอบคุณ ป๋าธนาที่ช่วยคิด ผมละเคยคิดแล้วว่าจะทำไงแต่คิดไม่ตกสะมี ตอนนี้เก็ทแล้ว หุหุ


วันจันทร์, สิงหาคม 13, 2550
Super Macro Equipment ชอบไอเดียครับ


ผ่านไปเห็นมาขอยืมมาแปะหน่อย ไอเดียรุงรังดีครับ ชอบชอบ
http://www.mzephotos.com/equipment.html
วันเสาร์, พฤษภาคม 12, 2550
ถุงยางกล้อง
 ไว้กันน้ำ กันความชื้น ถ่ายรูปในน้ำก็ได้อิอิ
ไอเดียตามนี้ http://www.diyphotography.net/diy_the_cheap_yet_shamefull_underwater_housing
และยังมีไอเดีย อื่นๆน่าสนใจอีกมากมาย http://www.diyphotography.net/
สมัครสมาชิก:
บทความ (Atom)